
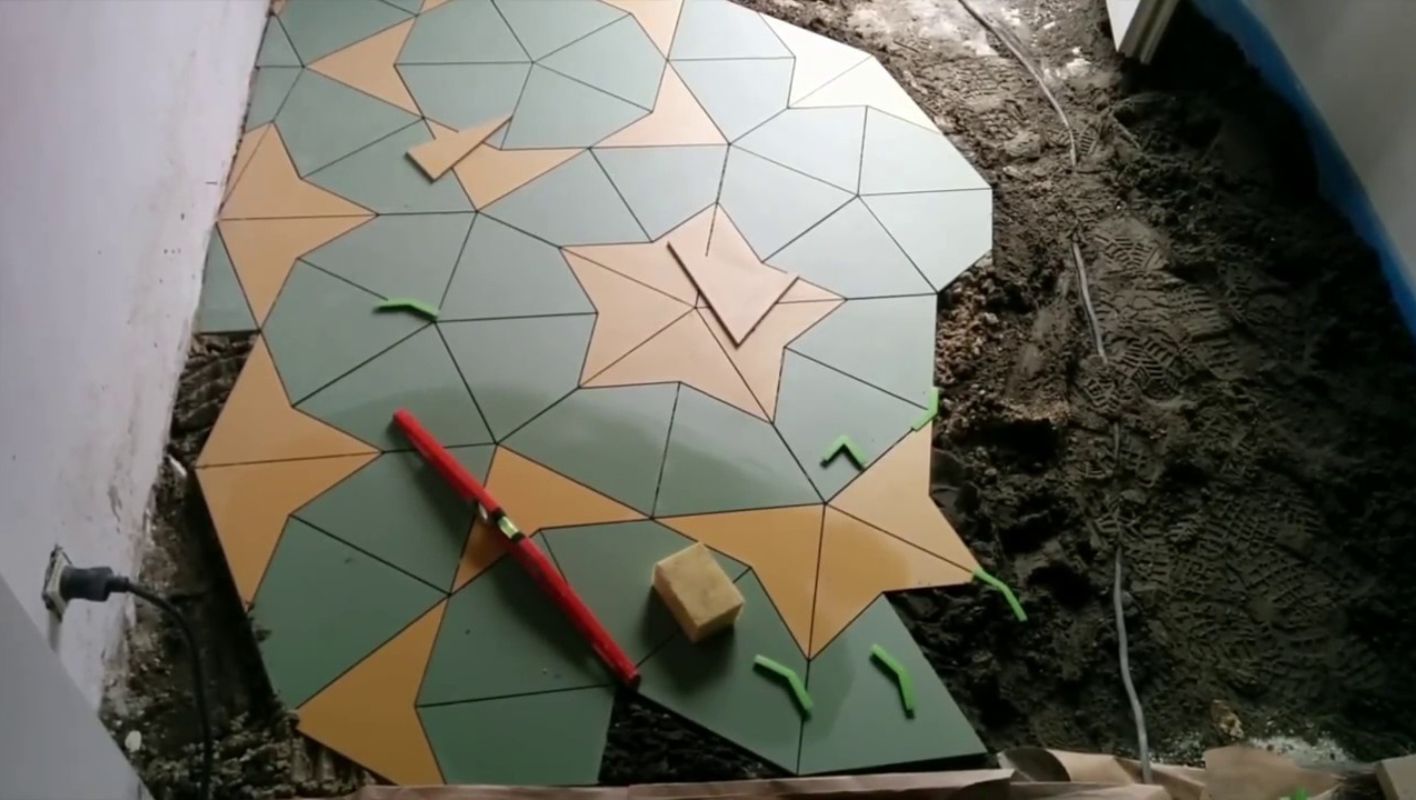
Ever looked at a Penrose tiling and wondered if you could create that mesmerizing pattern yourself? Let’s dive into this artistic challenge together.
To lay Penrose tiling like a pro, start by mastering its intricate pattern of kites and darts. This unique design demands precision and a keen eye, as it doesn’t repeat. Use templates to guide each piece, ensuring a flawless, artistic finish that captivates any onlooker.
When I first embarked on my Penrose tiling adventure, I remember feeling both excited and daunted. It’s like piecing together a puzzle where every piece fits in more ways than one! Precision becomes your best friend here. As you delve into this project, I’ll share some tried-and-true tips to make your journey smoother. We’ll talk tools—trust me, the right ones make all the difference—and pinpoint common pitfalls to sidestep. So, grab your spirit of creativity and let’s turn this complex task into a masterpiece that you’ll be proud of.
Penrose tiling requires careful planning and precision.True
The non-repeating pattern demands meticulous planning for accuracy.
Penrose tiling uses only squares and triangles.False
Penrose tiling uses kites and darts, not squares and triangles.
What Are the Essential Tools for Penrose Tiling?
Have you ever stared at a Penrose tile pattern and wondered how to bring that beauty into your own space?
To start your Penrose tiling project, you’ll need a top-notch tile cutter, digital calipers for precision, and a dependable adhesive. Accessories like spacers and a grout float can make the process smoother and more professional.
Essential Tile Cutting Tools
I remember the first time I tackled a Penrose tiling project—it was both exciting and a bit overwhelming. The key to success was having the right tools. A tile cutter1 became my best friend for making straight and diagonal cuts, while a wet saw was crucial for those tricky intricate patterns that are so characteristic of Penrose tiling.
| Tool | Purpose |
|---|---|
| Tile Cutter | Straight and diagonal cuts |
| Wet Saw | Intricate and curved cuts |
Precision Measuring Instruments
I quickly learned that precision is everything. Digital calipers were indispensable, helping me measure each tile to the millimeter, ensuring they all fit perfectly into the overall pattern. I also used a laser level to keep everything consistent over larger areas—these tools made the difference between an amateur job and a professional-looking masterpiece.
Achieving the correct dimensions2 for each tile is crucial.
Adhesive and Grouting Tools
A strong adhesive is essential, especially if you’re working with vertical surfaces. I experimented with different types until I found one that held up to environmental challenges. Once the tiles were set, using a grout float to spread grout evenly was vital for filling gaps and securing the tiles in place.
Accessories for Fine Tuning
Don’t underestimate the little things! Spacers were vital for keeping consistent gaps between tiles, maintaining that flawless look of the Penrose pattern. And I can’t count how many times a rubber mallet helped me gently tap tiles into place without cracking them.
Safety Equipment
I learned pretty quickly not to skimp on safety gear. Always have goggles to shield your eyes from flying shards and gloves to protect your hands from those sharp edges. Trust me, safety should always be top priority when dealing with these tools.
Don’t overlook safety when handling sharp tools3.
With these tools in your arsenal, you’re set to embark on your Penrose tiling journey. Whether you’re a seasoned pro or just starting out, the right equipment makes all the difference in crafting a stunning and safe installation.
A tile cutter is essential for Penrose tiling.True
Tile cutters are vital for making precise straight and diagonal cuts.
Laser levels are unnecessary in Penrose tiling.False
Laser levels help maintain uniformity across large surfaces, aiding precision.
How Do You Plan a Non-Repeating Pattern?
Remember the time you stumbled upon a mesmerizing mosaic and wondered how it never seemed to repeat? Designing a non-repeating pattern might seem like magic, but it’s actually a fascinating blend of art and math.
To plan a non-repeating pattern, start with a geometric framework like Penrose tiling. Use mathematical rules to guide the arrangement, ensuring each section is unique, balancing structure with randomness for an engaging design.
Understanding Non-Repeating Patterns
I remember the first time I encountered a non-repeating pattern in nature—it was on a hike, and I noticed how the leaves on a tree branch seemed to arrange themselves in an unpredictable yet harmonious way. Non-repeating patterns, or aperiodic patterns, are all around us in nature, art4, and architecture, captivating us with their complexity and beauty.
The Role of Mathematics
Mathematics is like the secret sauce that makes non-repeating patterns possible. Have you ever heard of Penrose tiling? It’s a method that uses shapes to fill a space without ever repeating the pattern. This concept was a game-changer for me when I realized how it cleverly uses rotational symmetry and reflection, creating designs that are both structured and chaotic.
| Concept | Description |
|---|---|
| Penrose Tiling | Uses two shapes that tile a plane aperiodically |
| Quasicrystals | Patterns found in certain types of alloys |
Steps to Plan Your Pattern
- Choose a Framework: Decide if your pattern will be geometric or organic. I once tried designing with Penrose tiling for a project—it added such an interesting depth to my work.
- Define Rules: Establish rules for interactions. I found setting angles and distances crucial for maintaining harmony.
- Use Software: Design software can be your best friend here. It handles the complex calculations, letting you focus on creativity.
Examples in Nature
Nature is the ultimate artist when it comes to non-repeating patterns. Think of the intricate patterns on a butterfly’s wings or how no two snowflakes are identical. Observing these can spark inspiration for creating your own unique designs.
Practical Applications
Incorporating non-repeating patterns into your work can make your projects stand out. For instance, unique tile patterns can transform an ordinary space into an extraordinary one by breaking visual monotony and enhancing aesthetic appeal. I’ve seen how these designs elevate design projects5 and offer a fresh perspective in fields ranging from quilt design6 to advanced material science.
Understanding these principles opens up endless possibilities, allowing us to blend predictability with surprise—a balance that’s both challenging and rewarding.
Penrose tiling uses two shapes to tile a plane aperiodically.True
Penrose tiling is known for using two specific shapes to create non-repeating patterns.
Non-repeating patterns always have translational symmetry.False
Non-repeating patterns lack translational symmetry, which prevents repetition.
What Mistakes Should You Avoid When Laying Penrose Tiles?
Remember the time I decided to tackle a DIY project with Penrose tiles? It was both a puzzle and a masterpiece in the making. Here’s how you can avoid my early blunders and get it right from the start.
To avoid mistakes when laying Penrose tiles, focus on precise pattern alignment, choose the right adhesive, and keep consistent spacing. Proper planning and careful execution are your best friends for a flawless finish.
Misaligning Patterns: The Art of Precision
I recall the first time I laid out Penrose tiles. I was so excited, thinking I’d breeze through it like any other tiling project. But oh boy, was I wrong! The aperiodic nature of these patterns threw me off completely. Unlike regular tiles, Penrose patterns don’t repeat, so even a slight misalignment can throw the entire design out of whack.
To get ahead of this, I learned to plan meticulously. Now, I always start with a digital mock-up or at least a paper layout before diving in. Using digital tools7 has become my go-to for visualizing how these intricate shapes will come together seamlessly.
Choosing the Right Adhesive: A Sticky Situation
Another rookie mistake I made was underestimating the importance of the right adhesive. The unique shapes of Penrose tiles demand an adhesive that allows for tiny adjustments but doesn’t set too quickly. After some trial and error—and yes, a bit of sticky chaos—I discovered the importance of consulting with suppliers for adhesive recommendations specific to my tile material.
Here’s a quick reference from my experiences:
| Tile Material | Recommended Adhesive Type |
|---|---|
| Ceramic | Thin-set mortar |
| Porcelain | Polymer-modified mortar |
| Stone | Epoxy-based adhesive |
Consistent Spacing: Mind the Gaps
I remember thinking that since Penrose patterns don’t repeat, spacing wouldn’t be as crucial. I couldn’t have been more wrong! Uneven gaps can really mess with the aesthetic flow. Now, I always use spacers to maintain uniformity and ensure a seamless look. Learning about proper tile spacing8 has made all the difference in my projects.
Planning and Execution: The Blueprint for Success
My early attempts taught me that winging it just doesn’t cut it with Penrose tiling. Precision starts with planning. I now measure my space thoroughly and plan for every tile cut before laying down even one piece. This preparation includes calculating enough tiles to cover breakages and consulting experts for additional insights9 on Penrose techniques.
Embracing these lessons has not only reduced my mistakes but has also elevated the quality of my tiling projects significantly. Whether you’re just starting out or refining your craft, these steps will guide you toward success.
Penrose tiles require repeating patterns for alignment.False
Penrose tiles are aperiodic and do not repeat, making alignment crucial.
Epoxy-based adhesive is suitable for stone Penrose tiles.True
Epoxy-based adhesive provides strong bonding for stone tile materials.
Can Penrose Tiling Be Used in Different Rooms?
Ever thought about turning your home into a canvas of geometric art? Penrose tiling might just be the design element you need to create a visually stunning environment.
Yes, Penrose tiling can be used in different rooms, offering each space a unique and captivating aesthetic. Its non-repeating patterns infuse a dynamic vibe, complementing various interior styles seamlessly.
Understanding Penrose Tiling’s Unique Patterns
When I first stumbled upon Penrose tiling, I was captivated by its non-periodic patterns that seem to dance across a surface without ever settling into repetition. This feature makes every room feel like its own masterpiece, completely unique and tailor-made just for you. Imagine walking into your living room or bathroom and feeling like you’re stepping into an art installation rather than just another room in the house.
Practical Applications in Various Rooms
- Living Room: Think of an accent wall or flooring that doesn’t just fill space but becomes a talking point.
- Kitchen: Picture a backsplash so intricate that it turns meal prep into a vibrant visual experience.
- Bathroom: With its water-resistant materials, Penrose tiles offer both beauty and practicality for bathroom floors or walls.
| Room | Application | Benefits |
|---|---|---|
| Living Room | Accent Wall, Flooring | Sophistication, Elegance |
| Kitchen | Backsplash | Vibrancy, Unique Design |
| Bathroom | Floors, Walls | Water Resistance, Distinct Look |
Considerations for Installation
I won’t sugarcoat it—installing Penrose tiles can be a bit of a puzzle. It’s crucial to get the alignment right to maintain that stunning visual effect. Having done it myself, I’d definitely recommend seeking professional guidance10 if you’re aiming for perfection.
Mixing Styles and Materials
Don’t shy away from mixing Penrose tiles with other materials like hardwood or metal accents. I once combined them with oak floors, and the contrast was nothing short of spectacular. It’s all about experimenting to find what speaks to your personal style.
The Mathematical Beauty of Penrose Tiling
There’s something deeply satisfying about knowing that your home decor is not just beautiful but also mathematically intriguing. When guests asked me about the pattern, I took pride in explaining the mathematical principles11 behind it—it’s like living inside a piece of art that tells a story.
By embracing these aspects of Penrose tiling, you can transform various rooms in your home into personalized spaces that reflect your taste and style. It’s about more than just aesthetics; it’s creating an environment that’s uniquely yours.
Penrose tiling is suitable for kitchen backsplashes.True
Its intricate patterns add vibrancy and a unique design to kitchens.
Penrose tiling patterns are periodic and repetitive.False
Penrose tiling is non-periodic, meaning it doesn't repeat regularly.
Conclusion
Learn how to expertly lay Penrose tiling with precision tools and techniques, creating stunning non-repeating patterns that enhance any space’s aesthetic appeal while avoiding common installation mistakes.
-
Explore top-rated tile cutters to ensure clean, precise cuts necessary for complex Penrose patterns. ↩
-
Learn how to use digital calipers effectively for accurate tile measurements. ↩
-
Discover essential safety gear to protect yourself while cutting tiles. ↩
-
Explore how artists use non-repeating patterns to create visually stunning works that maintain intrigue without repetition. ↩
-
Discover how non-repeating patterns enhance design projects, adding depth and visual interest to spaces. ↩
-
Find inspiration for unique quilt designs that avoid repetition, offering creative and dynamic visual appeal. ↩
-
Explore digital tools that simplify the layout planning process, ensuring pattern accuracy and saving time. ↩
-
Learn techniques for consistent tile spacing to achieve professional-level results in your tiling projects. ↩
-
Discover advanced techniques to enhance your skills in executing complex Penrose tiling patterns. ↩
-
Find professional tips and guidance on installing Penrose tiles for best results. ↩
-
Understand the mathematical concepts behind Penrose tiling to appreciate its unique patterns. ↩






